Monday, March 31, 2014

[COSPLAY] Spirited Away - Haku's Fundoshi pt.3, "The Detail Work"


Haku's Etchū Fundoshi, w/ finishing details completed

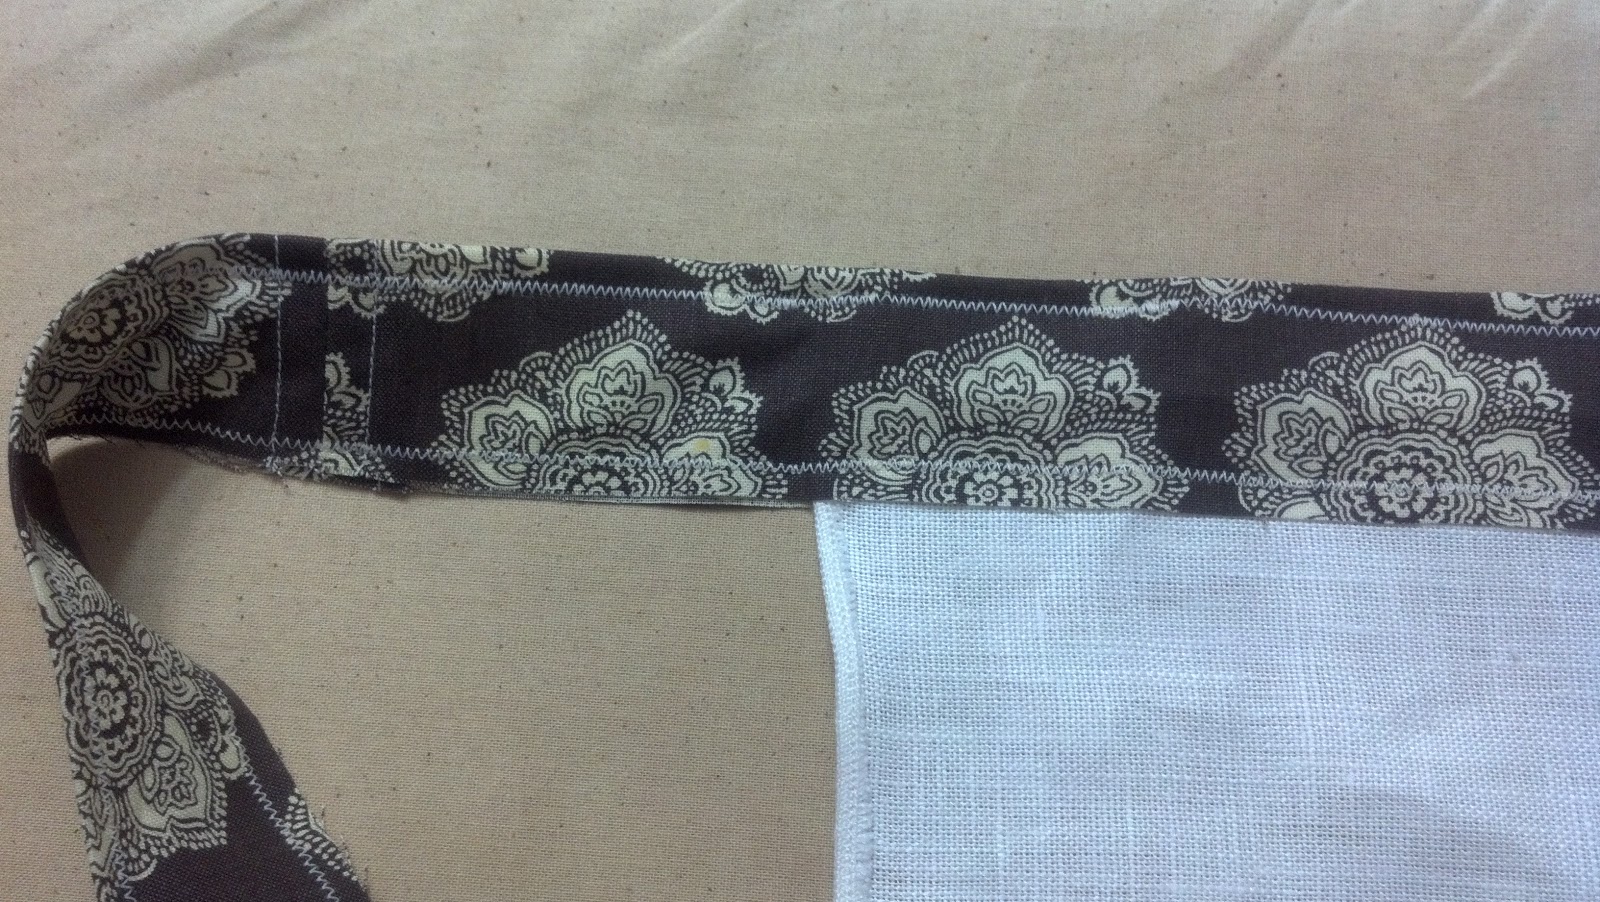
After finishing the main work for this costume piece, I wanted to add a few details that would make it more realistically traditional.  To do that, I frayed the raw edge of the waist ties to match the slight fraying of the selvage edge at the bottom of the main panel and then added traditional "fray-stop" embroidery to the ends of the waist ties, as suggested in the pattern from which the Hippari and Monpei for this cosplay will be crafted. It took about an hour to pull the horizontal threads loose from the bottom edge of the waistband up to the lower seam, but the finished effect is a much softer look.

BEFORE fraying the lower hem of the waist ties
AFTER fraying the lower hem of the waist ties

The embroidery on the ends of the waist ties gave me nightmares, however.  I followed the instructions for a traditional Reversed Fan design (on the left in the picture below), but it just didn't look as elegant as the pictures in the pattern brochure.  It also came out differently on the back than the front (top left vs bottom left, in the picture below).  I removed the stitching and tried the pattern again three or four times, just in case I was doing something wrong, but it just didn't look "good".  I know this piece won't be seen outside the costume, but I'd know the ugliness was there, lurking within the voluminous outer layers, taunting me with its imperfection, and that just won't do!

the suggested reverse fan pattern (left) and a boxed star pattern (right)

Unhappy with the fan pattern, I did a bit of research on embroidery and came across this Glossary of Cross-stitch, Needlework, and Embroidery.  This phenomenal resource provides pictures and directions for hundreds of stitches and repeatable designs.  I found a Reversible Boxed Star pattern and tried it; to my relief, it looked great AND it was identical on both sides!

the boxed diamond that will be used on all outerwear for this cosplay

On the waist ties for the "spare" fundoshi, I added a diamond to the boxed star.  The Boy liked this design better, so it's what I will use as the fray-stop signature on ties for the other pieces of our Haku and Sen costumes.

I loved putting together this initial piece for our costumes, and I'm looking forward to starting the under Hippari for Sen and the outer Hippari for Haku next!

[COSPLAY] Spirited Away - Haku's Fundoshi pt.2, "The Loincloth"

After the successful test run of this piece - and knowing that I wouldn't have an abundance of time to work on it with this being the start of Spring term for USG schools - I took advantage of last weekend to cut, press, sew, and finish the etchū fundoshi that will serve as the undergarment for the Boy's "Haku" costume that is his half of our Spirited Away couple's cosplay.


THE FINISHED PANEL W/ ATTACHED WAIST TIES

After the test run, it was decided that the raw dimensions for the main panel should be 16"Wx34"L.  Out of my almost yard of nice linen, I was able to cut two panels of this length, with a bit of fabric left over to make make costume-internal belt pouches later on.  I left the selvage as-is on the end that would hang free, reasoning that economy of time and effort is key to this piece. After all, Yubaba certainly wouldn't spend one cent extra of her precious money for finesse work on undergarments for our hypothetical spirit serfs!

After cutting the raw panels, I realized that the edges didn't line up properly, so I needed to address this before proceeding.  I was taught to straighten the grain by "truing" Aida cloth when I learned how to cross-stitch.  This method works well on loosely woven fabrics (like the linen I'm using for the main panel), as you simply pull loose threads one-at-a-time down the edge of a fabric panel until you can pull a single thread loose from one end to the other.  Do that for each side fabric panel then trim the "fringe".  Be careful to not trim too close and create new snipped threads, and your fabric is ready to use in your project.

PULLING LOOSE THREADS TO STRAIGHTEN THE GRAIN

 
If you are working with fabrics that have a tighter weave, the American Doll Outfitters website
 tells 
how to straighten the grain by stretching, drawing a gathered thread, or tearing the fabric.

Before I started this project, I didn't know how to make a rolled hem, narrow or otherwise.  I read several blog posts, watched more than a few videos, and wasted a lot of scrap fabric trying to figure it out.

My first tragic attempts at creating rolled hems with a Narrow Hem Presser Foot

My darling Boy, noting my rising frustration, suggested that I post a social media-based call for help.  Within the hour, I received several great bits of advice, made a new sewing mentor friend, and was linked to a stunningly helpful blog.  A half-yard of 2"-strip scrap fabric later, and I could make perfectly turned narrow hems!

^^^ MY VERY OWN PERFECTLY NARROW ROLLED HEM! ^^^
Accomplished w/ help from friends and this Totally Stitchin' tutorial.

After pre-washing and ironing the patterned cotton fabric, I was able to get five 3"-wide strips.  The Boy wants long waist ties, enough to wrap around twice, so I cut one of the strips in half to have enough strips for two extra-long waist ties of equal length.

SIX 3"WIDE STRIPS - FOUR ARE 44"LONG AND TWO ARE 22"LONG

Using the smallest strips as the center, I sewed a long strip to each end and ironed the seams flat.  Then I laid the top edge of the linen panel on the center of open waist tie and  folded the tie in half (downward) as shown below.  Pins were used to hold the fabric together while I zig-zagged the top and bottom edges of each waist tie; top edge first to prevent the fabric from buckling when I sewed the bottom edge shut and (hopefully) when worn, too.

CENTERING THE PANEL ON THE WAIST TIE PRIOR TO PINNING
WAIST TIES PINNED TO THE LINEN PANEL; READY TO SEW!
This is a close-up photo of the stitching.  Narrow rolled hems at the side of the linen panel, straight stitches at the seam of short-and-long waist ties with two additional rows of vertical straight stitching to keep the raw edges flat against the skin, and the decoratively functional zig-zag stitching on the upper and lower edge of each waist tie.  I'd not realized it before, but the zig-zag stitching also makes the cotton just a touch stretchy; something good to know for future projects!

TWIN ZIGZAG HEMS ON TOP AND BOTTOM BORDER OF THE WAIST TIES

My next #cosplay post will feature images and descriptions of the finishing details for this costume piece.

[COSPLAY] Spirited Away - Haku's Fundoshi pt.1, "The Test Run"

The reference pictures from which I'm working for the Haku costume suggest a shorts-and-tee version of the hippari and monpei under the more visible pieces.  That would make these costumes three to four layers of clothing in total.  These costumes will be worn at summer conventions in the southeast USA by a person who abhors hot temperatures and con funk, though, so effective heat dispersion is a necessity.  With that in mind, the decision was made to forego the two piece underwear on the Haku drawings in favor of an etchū fundoshi, a historical Japanese undergarment for males, and a long inner tunic-vest instead of the two darker blue pieces.  Three fewer layers at the waist should up the con-comfort factor considerably.

The example from which I'm working: The Sharefun.JP Etchufundoshi
If you're curious, you can learn more about various forms of fundoshi HERE, or HERE
or HERE (if you want to giggle at the *gleams* coming off Fundoshi Boy in the How To Wear It section).

On a recent trip to Joann Etc during their post-New Year sale, the Boy purchased the Fiskars 3-pc Rotary Cutting Set for me.  I already had the smaller rotary cutting stick from Fiskars, but I'd nearly given up using it.  I had tried lining it up with a yardstick, but the side-bolt on the rotary cutters sits just below the height of the yardstick edge, so perfect lines were eluding me, not to mention the amount of cardboard I was chewing through trying to get neat fabric strips without ruining the table.  This ruler and mat eliminate those problems entirely.  This is definitely one of those tool combos that you never knew you needed until you have it and then wonder how you ever crafted without it once you've used it.  These tools will be invaluable as I cut the fabric for the the Haku fundoshi.

My new favorite tools: Fiskars 3-pc Rotary Cutting Set

While we were at Joann's, and while the Boy was browsing buttons and simulated gems for another project, I discovered in the Fabric Remnants Bin a near complete yard of baby-soft natural linen.  Hooray for half-off on expensive fabric!  I also found a half yard of cotton with an ivory and brown medallion design reminiscent enough of ikat weave fabrics that I could justify using it for the ribbon on Haku's etchū fundoshi.


Before cutting up my nice linen, though, I wanted to do a test run of the basic fundoshi pattern, so I cut up an old t-shirt to use as the fabric for my pattern test.  Most sites recommend a strip of fabric measuring 14"W x 40"L for the main body of this piece, but I was concerned more with construction on this first attempt than perfect stitches or measurements (since the pattern dimensions might have to be adjusted anyway).  After cutting off the top of the t-shirt from the armholes up and also cutting off the bottom hem, I was left with a rectangle roughly 16"W x 32"L.  Plenty for my test run!  After opening up the bottom hem piece, I also had a ribbon-esque strip long enough to use as the waist tie.


I did a row of zigzag stitching around all three "exterior" sides of the main piece so the well-worn and woefully distressed fabric won't unravel.  Then I tucked the center of one short end of the main piece into the fold of the "ribbon" and pinned both pieces together all along that short edge.


After that, I used a row of zigzag stitches (because they're what I need the most practice with right now) to sew the ribbon to the main body, and DONE!


After trying it on, the Boy said that it was super comfy, but suggested that the ties would hold better if they were longer and if the main body was closer to the standard length instead of my test run scrap length.  I got congratulatory kisses for my efforts, though, and the Boy said he's looking forward to seeing the finished piece, so I consider the test run a whopping success!

[COSPLAY] Spirited Away - Chihiro's Friendship Hairband

As shared on G+ and FB a couple of days ago (and now that I feel confident enough in my status as a Beginning Seamstress to attempt something outside-the-sewing-room wear-worthy), "Haku" and "Chihiro/Sen" from Miyazaki's "Spirited Away" will be my first official cosplay challenge.


I found a set of DA pages that provides a breakdown of pieces for each outfit and, from there, found a company in Asheville NC that sells a pattern for the hippari and monpei. After evaluating the crafting materials I have on hand, I realized that Chihiro's purple hairband is the first piece I can create for this couple's cosplay without having to make a run to my local Joann Etc.  I created two versions of this hairband - one crocheted and one knit, both using Caron Simply Soft Party in "Purple Sparkle" as this yarn matches the screen imagery perfectly.


We know from the character "Zeniba" that the canon method for crafting this "friendship hairband" is "knit one, purl two" (K1.P2), so I'll use the knit version I created until I can create a decent cord using only 2-3 K1.P2 rows.


CROCHET VERSION: started with a large hairband elastic and covered it with single crochet. After the elastic was covered, do one single chain (SC) as for a new row, then do half double crochet (HDC) in the space between each SC of starting row. Weave end to finish.  Overall, I like the way this piece looks, but its crafting method doesn't match the canon description so I can't justify using it for this cosplay.


KNIT VERSION: as for I-cord knitting w/ 2 double-point needles (size H), until 1.5x longer than length of needed elastic string. Then, thread elastic string through interior of cord, knot the ends together, and cover the knot with knit stitches.


ALSO: many thanks to +Nixie Shimo for modeling the hairband so I could take pictures of the finished piece.


[GAMING] Letting the Character Ask the Question


Often, in tabletop or live-action roleplaying games, you start out to play one thing and find that the character takes the fictional journey in an entirely different direction than what you'd planned. This can happen for many reasons - you and the GM weren't on the same page at character creation, the story you'd thought would be fun just isn't, or you discover something about yourself that you'd like to explore through the portrayal, just to name a few.

There are several tricks a player can use to keep to the original course, though it can just as often be fun to let the story find its own path. Regardless, I find that the fictional story gains a satisfying depth when you tie it to a central question. Doesn't matter if it's soul-searching and psychologically in-depth or light-hearted and just for fun. Crafting the story around that core often leads to a shared story that's more satisfying for everyone involved.

These are the core questions currently on my character plate, from the character's point of view. What questions are on yours?


The Camarilla, official fan club of White Wolf Game Studio
Catarina Francesca Josefina, of House & Clan Tremere
How much must we sacrifice for purity of purpose?

Holly Poppet, Lost daughter of Spring
When your entire life has been spent as the reflection, nurturing, and fulfillment of others' dreams and desires, is there anything left for the self that's solid and real?


Terminus, an independent White Wolf NWoD LARP
Roxana Love Hart, trailer-trash honey following her star
If all the world is a stage, what will it take to put me in the lights with my name at the top of the marquee?
--- Roxy's Angel
Do I remain steadfast with faith in His plan, or is it as _He_ says and we are bound by our nature to succumb to urges spawned by betrayal?

Whisper, touched by Pandemonium and Guardian of Humanity's Right to Remain Ignorant
- She hasn't told me her question yet, but it seems to have something to do with where and how firmly should lines in the sand be drawn and defended.


Friday Night Frights, a tabletop White Wolf mortals game
Samantha Winthrop, well-heeled Atlanta teen; a splash of Buffy with a healthy dose of Veronica Mars
I don't even know what's out there; do I have what it takes to find out? Once I know it for what it is, do I have the wherewithal to carve out my own destiny?


Warhammer FRPG, a tabletop high-fantasy setting
Pelgrana, Wood Elf Thiefling
- How long can I dance on that little gilded line between greed and GREED before my own party hoists the petard?

Welcome to the Import!

My personal project this afternoon has been to separate my "BeckieSueDalton" blog into a "creative stuffs" one and a "smart stuffs" one.  Now that I've finished the basic setup for the creative one (hooray!), I'm at the point of transferring posts from the original blog to here.  My hope is to have this finished out tonight so I can start updating both blogs regularly - especially with the progress made on our backyard container garden, and with exciting things happening on my gaming and school horizons.

Stay tuned; there's lot of fun projects ahead!